If you’ve ever cooked with scent leaf (also called African basil or Ocimum gratissimum), you know how amazing it smells and tastes.
But here’s the thing most people don’t know — beyond just plucking the leaves for pepper soup or tea, you can actually deseed scent leaf and grow your own fresh supply right at home.
The process might sound intimidating at first, but trust me, it’s simple once you understand it.
In this guide, I’ll walk you through how to deseed scent leaf step by step, from identifying mature seeds, to harvesting, drying, cleaning, and storing them properly.
This article will give you everything you need.
Why Should You Deseed Scent Leaf?
So, why go through the trouble of deseeding scent leaf instead of just buying more plants?
The answer is simple:
- Propagation and Gardening – Deseeding ensures that you get fresh seeds that you can plant again. This is how farmers and home gardeners keep their scent leaf gardens going season after season.
- Saving Costs – Buying scent leaf seeds or seedlings every time can get expensive. When you know how to collect and deseed them yourself, you’re saving money in the long run.
- Sustainability – Collecting and saving seeds helps you cut down on waste. Instead of relying on mass-produced seed packets, you’re creating your own natural supply. It’s an eco-friendly practice and keeps local plant varieties alive.
- Control and Quality – When you save your own scent leaf seeds, you know exactly where they came from. No chemicals, no GMOs, just pure organic seeds from your own garden.
Think of it like this: every time you deseed scent leaf, you’re creating a cycle of abundance.
What Are Scent Leaf Seeds?
Before we jump into the actual steps, let’s pause for a second and talk about the seeds themselves.
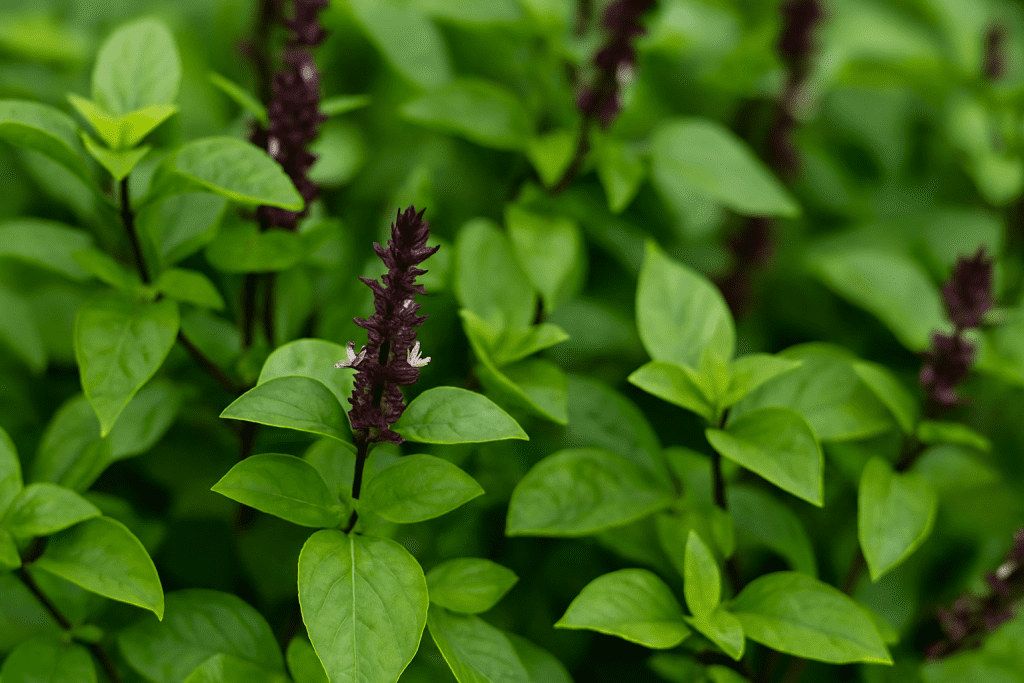
Scent leaf produces tiny black seeds that form after the plant flowers. You’ll notice that after the small white or purple flowers bloom, they eventually dry up and form seed pods.
These pods contain the seeds you’re after.
Here’s what you need to know:
- Location of seeds: Seeds are found in the dried flower heads of the plant.
- Size and look: They’re very small, round, and black or dark brown in color.
- Maturity signs: The pods turn brown, dry, and brittle when the seeds inside are ready for harvest. If they’re still green, it means the seeds are not yet mature.
- Best time to collect: Late flowering stage, usually at the end of the plant’s life cycle.
👉 Quick tip: If you try to deseed scent leaf before the pods dry completely, you’ll end up with immature seeds that won’t germinate well.
For a visual idea of how basil family seeds look, you can check this Spruce guide on saving basil seeds since scent leaf is closely related to basil.
Preparation Before Deseeding Scent Leaf
Okay, so you’ve spotted mature seed heads on your scent leaf. What next?
Before you start deseeding, you need to prepare properly.
– Tools You’ll Need:
- A pair of scissors or garden shears (for cutting the seed stalks).
- A clean, dry bowl or tray (to collect seeds).
- A paper bag or cloth bag (for drying and storage).
- A sieve or strainer (for separating seeds from chaff).
- Gloves (optional, to keep your hands clean).
– Best Time to Harvest:
- Morning hours are ideal when the sun isn’t too harsh and the plant is less stressed.
- Choose a dry day – harvesting on wet or rainy days can cause mold to form during drying.
- Wait until the seed pods are fully dry and almost crispy to touch.
– Cleanliness Matters:
Always use clean tools and containers.
Any dirt or moisture can affect seed quality and reduce germination chances later.
Step-by-Step Process: How to Deseed Scent Leaf
Now let’s get into the fun part. This is where you actually deseed the plant.
Step 1: Harvest the Seed Heads
- Locate the brown, dried seed pods at the top of the plant.
- Cut the seed-bearing stalks carefully using scissors or garden shears.
- Place them upside down in a clean paper bag or bowl.
👉 Pro tip: Don’t shake the pods too hard while harvesting, or you’ll lose seeds on the ground.
Step 2: Dry the Seeds Properly
Drying is very important because scent leaf seeds can easily spoil if they remain damp.
- Spread the seed heads on a tray or newspaper in a shaded, airy spot (not under direct sunlight because that can damage seed viability).
- Let them dry for 5–7 days until the pods are crispy.
- You’ll know they’re ready when they crush easily between your fingers.
👉 Avoid drying in plastic bags — it traps moisture and encourages mold.
Step 3: Separate Seeds from Pods (Deseeding Properly)
Now comes the main deseeding step:
- Take the dried seed heads and rub them gently between your palms to release the seeds.
- Alternatively, you can crush the pods lightly inside the paper bag and shake it. The seeds will fall out naturally.
- Use a sieve to separate the tiny black seeds from the chaff and broken pod pieces.
👉 This part requires patience because the seeds are very small. Work slowly so you don’t lose them.
Step 4: Clean and Collect the Seeds
- Once separated, pick out any debris or damaged seeds.
- Transfer the clean seeds into a dry bowl or paper envelope.
- Make sure they’re completely dry before storage as moisture is the biggest enemy of seed saving.
How to Store Scent Leaf Seeds
You’ve got your seeds – now how do you make sure they stay viable until planting time?
- Use airtight containers like glass jars with tight lids.
- Label the container with the date of collection. Scent leaf seeds generally stay viable for up to 2 years if stored properly.
- Store in a cool, dry place—avoid humid areas like the kitchen.
- For longer storage, you can keep them in the fridge (not freezer) in a sealed container with a little silica gel to absorb moisture.
👉 Remember: The drier and cooler the storage, the longer your scent leaf seeds will last.
Common Challenges When Deseeding Scent Leaf (And How to Fix Them)
Now, here’s the truth, deseeding scent leaf isn’t always smooth sailing.
Sometimes things go wrong, and if you don’t know what’s happening, you can lose a whole batch of seeds.
Let’s go through the common problems and how you can fix them.
1. Mold During Drying:
If you notice your seeds turning soft, smelling odd, or clumping together, that’s mold.
This usually happens when you don’t dry them properly.
– Fix:
Always dry seed heads in a well-ventilated area, away from direct sunlight but where air circulates freely.
Use paper or cloth — not plastic — because plastic traps moisture.
2. Seeds Not Germinating:
You collected seeds, planted them, and nothing sprouted.
Frustrating, right?
This often happens when the seeds weren’t fully mature when harvested.
– Fix:
Only harvest seed pods when they’ve turned completely brown and brittle.
Also, check that you stored them in dry, cool conditions.
3. Pest or Insect Attack:
Sometimes tiny insects, like weevils, can get into stored seeds and destroy them.
– Fix:
Store seeds in airtight containers.
For extra protection, keep a small cotton ball with a drop of neem oil inside the storage jar — it acts as a natural insect repellent.
4. Losing Seeds During Deseeding:
Because scent leaf seeds are so tiny, they can scatter easily if you’re not careful.
– Fix:
Always deseed over a wide tray, bowl, or clean paper spread on a table.
This way, if they scatter, you can collect them easily.
Sustainable Practices in Saving Scent Leaf Seeds
When you’re deseeding, it’s not just about getting seeds for yourself, it’s about keeping the cycle of nature going.
Here are a few sustainable practices you can add to your routine:
1. Save Local Varieties:
Not all scent leaves are the same. Some are more aromatic, some grow bigger leaves, and some resist pests better.
By saving seeds from plants that thrive in your soil, you’re preserving a strong local variety that’s adapted to your environment.
2. Share with Your Community:
Instead of buying commercial seeds all the time, why not swap seeds with neighbors or gardening groups?
It builds community, saves money, and helps preserve biodiversity. There are even global initiatives like Seed Savers Exchange that encourage this practice.
3. Reduce Waste During Deseeding:
Don’t just throw away the leftover chaff and seed pods. Add them to your compost pile.
They’ll break down and enrich your soil naturally.
4. Practice Organic Growing:
When you plant your saved scent leaf seeds, avoid chemical fertilizers and pesticides.
Use natural methods like compost, neem spray, or companion planting. This way, the seeds you save for the next season will be pure and chemical-free.
Final Wrap-Up
So there you have it — a complete step-by-step guide on how to deseed scent leaf.
You harvest the pods, dry them properly, separate the seeds, and store them the right way, and you now know exactly how to do it like a pro.
Here’s a quick recap:
- Wait until the seed pods are brown and dry before harvesting.
- Dry them in a cool, airy space – not under harsh sun.
- Gently crush and sieve the pods to release seeds.
- Store the seeds in airtight containers, labeled and dated.
- Keep everything clean, dry, and pest-free.
The beauty of deseeding scent leaf is that you’re not only saving seeds but also saving money, preserving culture, and living more sustainably.
So the next time you see your scent leaf flowering and forming pods, don’t just ignore them. Take a few minutes to harvest and deseed.
Your future self will thank you when you’ve got jars of fresh, organic scent leaf seeds ready for the next planting season.
✨ If you’re serious about learning more, you can also check our detailed guide on seed saving.